Posts

Showing posts with the label polymer clay

Open Armed Girl Wall Hanging

Image
Here's a hanging Thank You card I've made for some friends. The letters are polymer clay painted with some silver and bronze paints to give them sheen. The heart is pc too. I laminated the colored figure to a couple of layers of cardstock and made some hanging charms. You can download the figure and print her in different sizes using your own printer software. This is about 12 inches from loop to tail.

"Journey" to Ebay RELISTED

Image
Just listed as an Ebay auction - "Journey" - OOAK Art Doll figure with Quartz Crystal Wand.

Thing-a-day Got Away

Image
It's not so much that I haven't been making, it's that I haven't been keeping a very good record or making posts. As you see in the last post I did finish a doll over several days, with all the steps that entails. Here's what else I've been doing. I've been painting doll faces, and repairing some problems... Beading dolls... Finishing a commission... which includes yesterday making a bunch of charms from polymer clay. Today I'll be gilding and ageing these charms to be old gold, and adding the beads and wire to make some of them into the final touches for the commission. Also I'll be adding her hair. She will be delivered this afternoon. Then it's back to Miss Tick and Elphaba. The other things I've been doing are making lots of posts on my other Doll blog, and our taxes.

TAD - Sunday 8th - Doll progress

Image
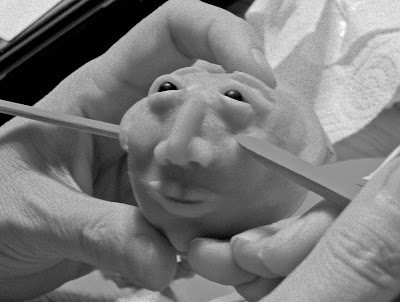
I have commenced the work on my Miss Tick doll for the Doll Street Dreamers Discworld challenge. She has an aluminum foil core with Premo polymer clay over, like all the bead head dolls, and glass beads as eyes. I have found that being patient and doing several bakings creates the best results. I bake the ball, with the ridge first. (The ridge is to prevent the fabric head and hair from sliding backwards.) The second firing is the the nose, cheeks, mouth and chin, while the third firing cures the eyes and eyebrows, which you see whiter in these photos. The next step tomorrow will be to paint the shading, skin details, eyebrows and makeup her, and then after a day for the paint to fully dry I will seal her with Future Floor Wax for a gentle sheen. I'm so happy to have learnt about using acetone to smooth the polymer clay. I makes a nice difference, when I compare this doll to one of my earlier dolls that is still at home.

Shaman Spider Woman Bead Head Doll

Image
This is the Shaman/Spider Woman doll I made as a very special wedding gift. I wanted to invoke the Native American connection to their wedding ceremony . Many of the items for the charms and trim are from vintage jewelry including a Kokopelli pin and road runner turquoise earrings that were my mother's. Some of the beads were new purchases, others from vintage necklaces taken apart. Many of the fabrics used in the patchwork over robe were given to me by my mother-in-law. She has a huge collection of different vintage fabrics that she has collected over the last 40+ years in her travels. I combined upholstery fabrics with antique embroideries, printed Indian silks and quilting cottons, including small scale liberty prints. My daughter contributed a lot of her design talents to the project. It was she who designed the tattoos for the doll's cheeks. She also chose the yarn combination for the hair, to coordinate with the robes. She sewed the little felt bag for the Kokopelli , a

Shaman doll progress

Image
I have completed and presented this doll, a wedding gift for our friends who married in an extraordinary ceremony in Sedona, Arizona. My husband took some good shots of the completed figure, which I will post later tonight, I hope. But here are some in progress shots. This is the first time I have made cloth hands. Some blowing out of the silk, but I am still happy with the results, after needle sculpting and painting of details. My daughter designed the face painting - a spiral and a bear print.

Dryad Bead Head begun

Image
This doll head is using the lampwork glass eyes I bought at the bead show made by Ralph McCaskey. This doll will be a dryad whose robe will be made of handmade and a few manufactured leaves. You will notice the ridge running over the head between the ears. I have noticed a tendency for the headdress to want to slide backwards and I am expecting that this ridge will stop that from happening. It will not be visible in the final doll. Stay tuned....

If I just don't sleep...

Image
.....I should have my White Maiden bead head doll ready by Saturday . It's going to be a few days of take out too, I'm suspecting. At the moment she looks something like a mummy, but that will change (I hope!). More...er..shape to her body than the elderly Granny. Same 16 guage wire armature; this time I used a clamp to help hold the wire while I twisted and that saved a lot of ache in my hands. Polyfil batting and washed unbleached muslin. In Australia we call this unbleached calico. Note the hands already prepared. I made a quick jig out of toothpicks and some styrofoam packaging material. Not the most sturdy jig, but it got the job done. The beads around her face are a reclaimed wooden necklace. (Well the background is in focus, but you get the idea.) This is roughly where we are headed with her: Back to work...or I should say back to super Fun!! More later.

Finished!

Image
Well, other than her stander. I'm so very pleased with her. We will be taking some pro quality photos of her with her stander in the next few days.

Bead Head Granny progress

Image
I am very pleased with how her head is turning out. I have covered her with cloth "skin" and started the beading. Next will be her robes and hair. Did I mention how excited I am by how she is coming along? This is a hugely different project for me, in scale and character. I keep just stopping to stare at her. I'm loving it.

Dolls in progress for artisan fair

Image
Here are some enormous "bead" heads made from scratch in polymer clay over foil, with small ceramic beads for eyes. One is a young woman, maybe a bride or a dancer . The other will be an old granny, a spirit of the earth and harvest and a storyteller. Here are the sketches from my notebook that continue to inspire these figures, who are like giant wish dolls. I think I am going to make some other bead heads, with the hole going vertically to be charms and decorations. I have a charm trade coming up soon.